Drying Herbs & Spices


Gather the herbs you want to use. This is what grows here that I use: plantain, dandelion leaves, horsetail, sow thistle leaves, yarrow leaves, calendula whole blossoms, lavender, rose, spruce, lemongrass, rosemary, peppermint, clover (white and red flowers and leaves), cayenne , goldenrod, fireweed, stinging nettle, thyme, oregano, ground ivy (also called creeping Charlie), usnea lichen, chamomile. I also use feverfew and purslane that I grow myself. 


You don't need to use all of these herbs. Try whatever mix you have handy and can forage. All of these have healing, anti-inflammatory and anti-bacterial healing properties. I use a lot of plantain.  It's everywhere! The usnea is an important anti fungal herb, as well. You might, possibly, want to do an allergy test with some of these, just to make sure you aren't making a salve that you react to. If you are unsure of something growing, google it or take a close clear photo and ask online what it is. I enjoy gathering, drying and working with herbs. I like handling them, smelling them, sitting outside in the sun picking them. To me, it's fun. It's relaxing and my house smells wonderful with all these herbs drying everywhere. I try to leave long stems on the leaves or cut whole small branches so I can gather at the ends and hang somewhere. 


I dry small pieces in a single layer on a paper towel, turning every few days. You can dry them quickly in your car on a sunny day and your car will smell marvelous. You can dry them in the oven on a very low setting. Some people dry them in the microwave, however, they need to be half dry before microwaving or it will spark and start a fire. I guess some strong herbs have too much iron and mineral content for the microwave. (Believe me, it can happen, I know...) I think it's best to just leave them out of the microwave altogether. I usually use tin ties to tie bunches to a clothes hanger and hang it up. (No, I didn't put tin ties in the microwave, lol.) 


Stick a small piece of paper on the hanger with the herbs to label then. Sometimes it's hard to tell what they are when they are dry. I have hung herbs from hooks on the wall, on the ceiling fan, from curtain rods, from wires strung under the porch roof, from lamps, shelves, just about everywhere I could hang them. If you have herbs hanging, you will need to tighten the ties every day. As they dry, they shrink and fall out. If your floor is clean and you don't have cats and dogs that like to eat everything green, you can just tie them up again, but I think it's probably best to just tighten them daily at first. Also hang them high enough that your dogs and cats can't reach them. My cats LOVE horsetail. You can also tie them in paper bags, to keep out dust and insects and the bags will catch them as they shrink and fall out of the ties. 


If you can score large screens, you can make screen shelves on the deck with bricks and screens. That has worked well for me in the past but squirrels and mice can get them. You can also dry them on, and wrap them in, curtain sheers instead of screens and paper bags. They catch even the tiniest pieces. Good for drying seeds, as well. 


I usually give herbs about two weeks to dry very, very well and that's important. Everything that goes into the salve has to be completely dry, no moisture at all! If there's one drop of moisture in it, it will grow mold and go bad quickly. When the herbs are very dry, I crumble and grind in my spice grinder, if they need it. Some, like usnea. are so fine that they don't need it. I then put them in labelled glass jars. Any clean and very dry glass jar will do. Pickle jars work well. They will keep dry like this for years, until you are ready to make the salve and easy to use for cooking.


You can spend your summer collecting and processing the herbs & spices, then make the salve in the winter.

Making Salve with Dried Herbs


The first step is to make sure every single ingredient has been fully dried. I then grind them with a coffee grinder and store in glass jars for future uese. 

To make the salve: infuse the oil with the dried herbs. You can use any kind of oil that comes from plants or animals, (olive, almond, sunflower, canola, coconut - although coconut oil melts at 72 degrees F - warm room temperature, so I don't use it for salve. It would be constantly melted unless you kept it in the fridge.) - no mineral oil or petroleum products. 

There are several ways to do this. The easiest way is to fill a glass jar about one third full with dried, ground herbs. Fill to the top of the jar with oil leaving some air space. Stir it well, use a tight lid, put in a warm place like a south facing windowsill, on top of your fridge, etc. and shake whenever you walk by. Open daily to stir and let some air in. Leave this for 4-6 weeks. If you want to do this faster you can use a slow cooker. Use jars that fit in your slow cooker with the lid on. Set the jars with lids lightly on just to keep out condensation, full of herbs and oil, into the slow cooker and fill it full with hot water to about half the height of the jars . Cook on low for minimum 5 days, 7 days is better. Take the jars out every day, set on a towel, remove lid and stir. Put the lid back on and return them to the slow cooker. When all jars are out of the slow cooker, add more very hot water so it doesn't dry out. You will have to keep adding water to the slow cooker as the days go by. Just make sure the jars are out of it and it's hot water you are adding. You can turn it off over night so it's not cooking when no one is there to keep an eye on it. Mine goes off and on during the days when I'm cooking herbs. Be very careful handling the jars. They are HOT. Don't handle them with your bare hands. For faster infusion, you can use a steamer. I use the slow cooker method most of the time. When the 5-7 days are finished, strain the herbs. Toss out the cooked herbs. There is nothing left in them of any use. I use a little metal strainer with a coffee filter in it, set on a bowl or a wide mouth jar, to strain the oil. When you have clear, strained, herb infused oil, it's time to add the wax. 

 
You can use beeswax, soy wax or paraffin. All work equally well. I prefer to use soya wax for this purpose. Beeswax is becoming a non sustainable resource. I save my beeswax for lip balm. After straining the oil, you will need to reheat it to melt the wax. You can set the jars in a double boiler on the stove to heat. If the wax is just not melting, the oil is not hot enough. Do not leave oil heating unattended and do not over heat it. It should be just hot enough to melt the wax within a few minutes of stirring. When the oil is hot enough, add the wax and stir until dissolved. I use 100g of wax added to 400g of oil for salve. You can adjust this for your own preferences. Less wax makes a softer, oilier salve. When the wax is fully melted in the oil, pour it into your clean permanent containers and put the lid on. If the salve is grainy, the was hasn't fully melted. You can use a stick blender with it's hot and thin to insure a smooth finish, but if your are sure the wax is fully melted, this is not necessary. 

I have a slow cooker that I use only for infusing herbal oil. The oils leak out slightly and the slow cooker will get a coating of cooked oil with little use. I wouldn't use it for food. You can often pick up an old slow cooker at the thrift store. I have three, one for herbal oil infusion, one for making soap and one for food. 

Leave them sitting still for a few hours as the salve cools and hardens. 


My Cobbler - What is a cobbler?


My Old Fashioned Cobbler Recipe

What is a Cobbler? What is the difference between a cobbler, pie, tart, flan...these are all fruit pastries. 

A pie has both bottom and top crust and is at least 6" across. 

A tart is the same but cupcake size or smaller. 

A flan is a fruit dessert with a custard base

A tart is a fruit dessert with a pastry bottom and no top crust

A cobbler is a fruit dessert with no bottom

And so now you know...  


This is my best cobbler recipe. It's been in my family for a very long time. 


Fruit Cobbler

4 cups sweetened berries or enough to fill a loaf pan about 1/3 full.

1 cup flour
1/2 teaspoon salt
1/4 cup soft butter
1/2 cup sugar
1 1/2 teaspoon baking powder
1/2 cup milk

Combine dry ingredients with butter in a mixing bowl then add the milk and mix with mixer until well blended. Spoon on top of fruit in loaf pan. Bake at 375F for 45 minutes.


The Best Chocolate Cake You Will Ever Eat


This is the best chocolate cake you will ever eat! It is truly moist, dense and delicious and it is so easy to make from scratch! When I was growing up my mother’s best friend was a baker. This was her recipe.

1 3/4 cups flour
2 cups sugar
3/4 cups cocoa
1 teasp salt
2 teasp baking soda
1 teasp baking powder
2 eggs
1 cup buttermilk or 1 tablesp vinegar in 1 cup of warm milk, soured
1/2 cup oil
1 teasp vanilla
1 cup coffee, plain or flavoured.

I like to use flavoured coffee in this cake and also in the frosting. Usually I use hazelnut vanilla but for this one I used butterscotch coffee, because that is what I had on hand.

Combine all dry ingredients in a large bowl. Add remaining ingredients. Beat with mixer for 2 mins. Pour into two round greased and floured pans or one greased and floured rectangular pan.

The batter will be very runny, but that’s as it should be.

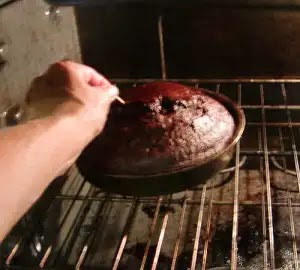
Bake at 350 degrees for 35-40 minutes, just until a toothpick inserted in the center of the cake comes out dry. Do not over bake and make sure it is done!! This will require you to watch the cake carefully for the last few minutes of baking time, occasionally testing it until it is perfect. The key to a truely fabulous cake is to take it out of the oven at exactly the right moment.


Make certain that your oven is calibrated properly. Most electric ovens get hotter over time so that they are baking at about 375F when you put the dial on 350F.

If you are mechanically inclined you can fool around with the thermostat inside the oven and adjust it in the right direction a tiny bit. We do this when we get another oven or when our oven is obviously too hot. You will need a good digital or oven thermometer to do this and it takes time. Adjust the thermostat in the oven a tiny bit, then turn the oven on until the light goes out. Use the thermometer to test the temperature in the oven when the light goes off, adjusting the oven thermostat slightly, over and over again until you get it exactly right. It could take an entire day to calibrate your oven, but its worth it! It makes a huge difference in baking to have the oven at the right temperature. It should be a few years before it needs it again.

Please don’t ask me for exact details. All ovens are different. Hubby does this and I don’t know exactly how he does it. You can probably find out on the ‘net’.

If you know that your oven bakes hot, you can always just turn it down a smidgen. If you turn it down too far and it is baking too cool, the cake will take longer and dry out before it gets done, so be careful with that. If it bakes too hot the cake will be overdone on the outside before it gets done on the inside.

Also, if you are using a glass dish you should bake at a slightly lower temperature.


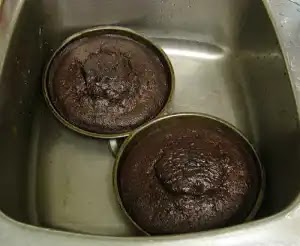
When the cake is done and removed from the oven it should cool to room temperature before frosting. I set my pans in very cold water in the sink to cool them quickly. Never, ever frost a cake that is even slightly warm. The frosting melts! You can make a fabulous cake and come back an hour later to find the second layer sliding off and sitting beside the bottom one and the frosting all pooling in the plate! (I found this out the hard way!)

When the cake has cooled completely it is ready to be frosted.

This is how I make frosting. I never use a recipe for it.

Put about 3.5 cups of powdered icing sugar in a large bowl. If making chocolate frosting, put about 1 cup of dry cocoa in with the sugar. Dont use an instant pudding mix in here to make flavoured frosting. It doesn’t dissolve. Jello that has been made and set might work well but I haven’t tried it yet.

Add about a tablespoon of vanilla or other flavour extract unless using cocoa, then you won’t need it, unless you want to add a specific flavour to chocolate frosting, like cherry. You can be creative here.

Add about this much butter.


Mix it slowly on low until the butter has been fairly evenly cut into the sugar and you have a dry, lumpy mix. Then add liquid very slowly, a tablespoon or so at a time until the frosting is the right texture. Beat it on high for a few minutes.


You can use any liquid. I use coffee to make the frosting for this cake. The same coffee that I put in the cake. The flavoured coffee makes especially good frosting.

I sometimes make an orange cake, using fresh orange juice to make a white cake and using fresh orange juice to make the frosting. Carrot juice in the frosting for a carrot cake?

If you put too much liquid in the frosting, just add a bit more sugar and mix again. Add only a tiny amount of sugar or liquid at a time until the frosting is the right texture. Aim for a little too stiff as opposed to a little too soft. The frosted cake will hold together better with a stiffer frosting but it will slide if the frosting is too soft.

If you made a layer cake you will need to cut the top off of the bottom layer, making it flat. Otherwise the finished cake will be slanted. 

After cutting off the top of the bottom layer, spread frosting on it carefully. You don’t want to tear up the cake without a top on it to protect it. Set the other layer on top of this frosted one and continue to frost the top and sides of the cake.


I like to drizzle some melted hard chocolate on the top of a chocolate cake and sometimes other cakes, as well. I buy chocolate Easter bunnies on sale after Easter, chop them and put them in the freezer for this purpose. If they are chopped up and frozen other people don’t eat them.


When I am making the frosting I melt about 1/3 of a bunny (You will have to use your judgement here) in a glass measuring cup that I have put in a small pot of water on the stove. I add a few drops of oil to it while it is melting to make it smooth. You will also need to stir it a lot and watch it carefully. As soon as it melts, turn the heat off.


When the cake is frosted you can drizzle the chocolate in lines across the top or dot it on. You can also make chocolate leaves with it. If you are going to make chocolate leaves, don’t put much oil in the chocolate while it is melting. You want it to get really hard when it cools.

To make chocolate leaves you will need some clean leaves from the garden to use as a mold. Paint the melted chocolate onto the leaf tops and let them cool until they get hard. Peel the leaf off the bottom. This should leave you with a chocolate leaf you can arrange on the top of the cake. I don’t usually have the time to do this.


This cake is especially good with handmade, chemical free black cherry wine! You can even use this in the cake instead of coffee. You can put it in the frosting too, if no children are eating it. The frosting doesn’t get heated so all the alcohol will remain in the frosting to be eaten. (Warn people before they eat it!)


If you keep an apple in the container with a cake, it will help to keep it moist.

Its not a miracle worker, however. If you don’t keep the cake well sealed, it will still dry out.

Most cakes freeze well, too, if sealed properly. Freeze half of it if you don’t think it will be eaten in a week.